How-to access Pika Spark’s EEPROM via I2C

Pika Spark is an Arduino Portenta X8 based micro robot control system combining an unprecedented amount of computing power and interfaces within an extremely small form factor. Additionally the Pika Spark features a 256 kBit I2C EEPROM (24LC256) for storing both configuration and user data. The 24LC256 EEPROM is connected to I2C1 (/dev/i2c-1). It's write-protect input is connected to the IMX8 application processor of the IMX8 and is tied to VCC via pull-up, enabling write-protection per default. This means that in order to write data to the EEPROM we need to consciously set the EEPROM_WP line low.

In this tutorial we will cover how to detect I2C devices using onboard Linux tools and how to write data to or read data from the Pika Spark's onboard 24LC256 EEPROM.


Schematic of the 24LC256 EEPROM onboard the Pika Spark


The preferred way of getting anything done on the Arduino Portenta X8 is by using Docker. So let's start by creating a Dockerfile that installs i2c-tools which contains a heterogeneous set of I2C tools for Linux: a bus probing tool, a chip dumper, register-level access helpers, EEPROM decoding scripts, and more.

FROM alpine:3.18
RUN apk add i2c-tools

In the next step a Docker image is built from the Dockerfile using docker build.

docker build --pull --no-cache --tag pika_spark_i2cdetect .

By using the i2c-detect tool of the i2c-tools package we can now check for all I2C devices connected to our bus of interest (in this case /dev/i2c-1)

docker run -it -u 0 --privileged \
  -v /sys/class/i2c-dev:/sys/class/i2c-dev pika_spark_i2cdetect \
  i2cdetect -y 1

resulting in the following output

     0  1  2  3  4  5  6  7  8  9  a  b  c  d  e  f
00:                         -- -- -- -- -- -- -- --
10: -- -- -- -- -- -- -- -- -- -- -- -- -- -- -- --
20: -- -- -- -- -- -- -- -- -- -- UU -- UU -- -- --
30: -- -- -- -- -- -- -- -- UU UU -- -- -- UU -- UU
40: -- -- UU -- -- -- -- -- -- -- -- UU -- -- -- --
50: 50 -- -- -- -- -- -- -- UU -- -- -- -- -- -- --
60: -- -- -- -- -- -- -- -- -- -- -- -- -- -- -- --
70: -- -- -- -- -- -- -- --

As can be seen the Pika Spark's EEPROM is detected at I2C address 0x50 on I2C1. This is the same for all Arduino Portenta X8 carrier boards.


Write data to EEPROM

In order to be able to read data from the EEPROM we first need to write data to the EEPROM. To this end the Pika Spark closely emulates the approach taken by Raspberry Pi for its own HATs via eeptools. An implementation tailored to Arduino Portenta X8 specific needs can be found at pika-spark/portenta-x8-eeprom-utils. We start by preparing a Dockerfile that is cloning and building the required EEPROM tools.

FROM alpine:3.18

RUN apk add git g++ make cmake linux-headers

RUN cd /tmp && \
    git clone https://github.com/pika-spark/portenta-x8-eeprom-utils && \
    cd portenta-x8-eeprom-utils && \
    mkdir build && \
    cd build && \
    cmake .. && \
    make install

COPY eeprom_settings.txt /

RUN eepmake eeprom_settings.txt eeprom_settings.eep

COPY start.sh /
RUN chmod ugo+x /start.sh
ENTRYPOINT ['/start.sh']

We further need to provide a eeprom_settings.txt file that contains the various mandatory data to be written to the EEPROM as well as a section for user defined data.

product_uuid 00000000-0000-0000-0000-000000000000
product_id 0x0000
product_ver 0x0000
vendor 'ACME Technology Company'
product 'Special Sensor Board'

custom_data
deadbeef c00 1c0d e
end

We also need to define a start script start.sh which defines the actions to be taken on container startup - flashing the EEPROM in our case.

#!/bin/sh
export PATH='$PATH:/tmp/portenta-x8-eeprom-utils'
eepflash.sh --write --device=1 --address=50 -t=24c256 -f eeprom_settings.eep

After building the Docker image from the Dockerfile via docker build

docker build --pull --no-cache --tag pika_spark_eeprom_flash .

we need to ensure that the at24 kernel driver module is loaded

modprobe at24

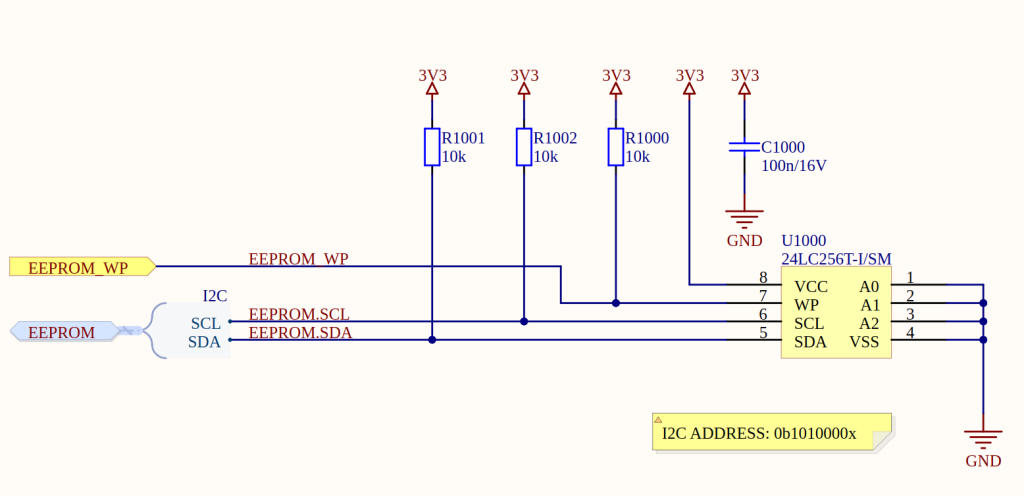
and that write protection for the EEPROM (by setting the EEPROM_WP line low) is disabled

echo 88 > /sys/class/gpio/export
echo out > /sys/class/gpio/gpio88/direction
echo 0 > /sys/class/gpio/gpio88/value

. By running the running the prepared container image we can now write the content from the eeprom_settings.txt file to the Pika Spark's onboard 24LC256 EEPROM.

docker run -it -u 0 --privileged \
  -v /sys/class/i2c-dev:/sys/class/i2c-dev pika_spark_eeprom_flash


Read data from EEPROM

When we want to read data from the Pika Spark's onboard 24LC256 EEPROM we leverage pika-spark/portenta-x8-eeprom-utils once again. Let's start by creating a simple image that only contains the required EEPROM tools:

FROM alpine:3.18

RUN apk add git g++ make cmake linux-headers

RUN cd /tmp && \
    git clone https://github.com/pika-spark/portenta-x8-eeprom-utils && \
    cd portenta-x8-eeprom-utils && \
    mkdir build && \
    cd build && \
    cmake .. && \
    make install

COPY start.sh /
RUN chmod ugo+x /start.sh
ENTRYPOINT ['/start.sh']

The start script start.sh dumps the content from the EEPROM into a file called eeprom_dump.epp which is then converted into human readable form using eepdump. Finally the content of EEPROM is printed to the shell.

#!/bin/sh
export PATH='$PATH:/tmp/portenta-x8-eeprom-utils'
eepflash.sh --read --device=1 --address=50 -t=24c256 -f eeprom_dump.eep
eepdump eeprom_dump.eep eeprom_dump.txt
cat eeprom_dump.txt

After building the Docker image from the Dockerfile via docker build

docker build --pull --no-cache --tag pika_spark_eeprom_dump .

we need to ensure that the at24 kernel driver module is loaded:

modprobe at24

By running the running the prepared container image we can now execute start.sh

docker run -it -u 0 --privileged \
  -v /sys/class/i2c-dev:/sys/class/i2c-dev pika_spark_eeprom_dump

displaying the content of the EEPROM in human readable form:

# ---------- Dump generated by eepdump handling format version 0x01 ----------
#
# --Header--
# signature=0x69502d52
# version=0x01
# reserved=0
# numatoms=3
# eeplen=115
# ----------


# Start of atom #0 of type 0x0001 and length 67
# Vendor info
product_uuid daf776b6-6f56-4f9f-8425-eda90883a476
product_id 0x0000
product_ver 0x0000
vendor 'ACME Technology Company'   # length=23
product 'Special Sensor Board'   # length=20
# End of atom. CRC16=0x2c56


# Start of atom #2 of type 0x0004 and length 10
# Error: atom count mismatch
custom_data
DE AD BE EF C0 01 C0 DE 
# End of atom. CRC16=0x529a

You are now able to read data from and write data to the EEPROM of your Pika Spark. Please make sure though that you do not change the product_id field as it is used to identify the Pika Spark during boot process.